Downloads And Free Trials
Download Virtual Machine
Experience the power of FirstWave solutions in one easy-to-install Virtual Machine. This package is curated by FirstWave and is the easiest way to install our apps, including NMIS and Open-AudIT, without the hassle of setting up a server.

Download FirstWave VM
FirstWave’s Virtual Machine is an all-in-one package to allow you to begin taking control of your network without the hassle of setting up a server. To help you get started, download the FirstWave VM which includes NMIS along with all of our latest network management modules, or find the installer for just NMIS in the next section.
This bundle includes NMIS 9, Open-AudIT 4, opCharts 4, opConfig 4, opEvents 4, opReports 4, opHA 3, opAddress 2.
The best part is that you can get a time-unlimited license for up to 20 nodes for each of these modules, absolutely free!

Quick Setup
Install +
1. Download the FirstWave Virtual Machine
If you haven’t already, hit the download button to get the FirstWave VM.
The virtual machine comes as an uncompressed .ova (Open Virtual Appliance) package, just over 1GB in size. Unless you have specific needs, we recommend you download the latest build.
2. Open your hypervisor
A hypervisor is a piece of software used to run virtual machines. FirstWave provides instructions for running our Virtual Machine on most popular hypervisors—but if you’ve never used a hypervisor before, we recommend the free VirtualBox solution, which you can download here.
4. Deploy the FirstWave Virtual Machine
The specific method of deploying the FirstWave Virtual Machine depends on your hypervisor. This page offers installation guides for VirtualBox and VMware Desktop Applications.
If you are deploying on another hypervisor, please use the appropriate guide:
To use OVF/OVA files with other virtualisation systems like KVM you may have to convert the OVF file to a native format; Two well-known tools for this purpose are virt-v2v (available in CentOS6/RHEL) and virt-convert (in Debian).
If you have the VM already deployed you can jump to Section 5.
3a. Deploy on VMware
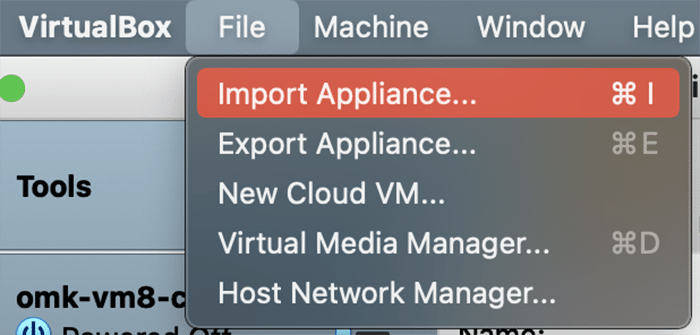
Go to File –> Open and select the FirstWave Virtual Machine .ova package you just downloaded. The Virtual Machine should import with all settings automatically.
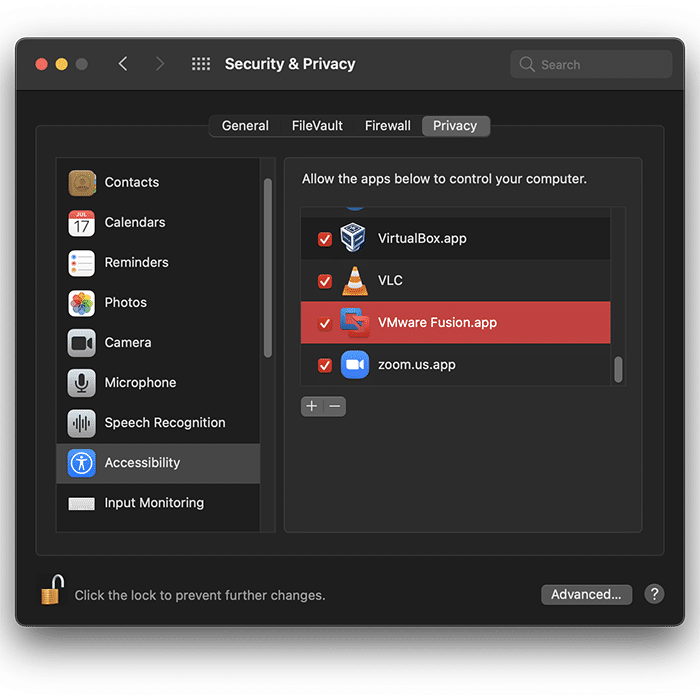
Ensure that you have granted Accessibility permissions in System Preferences for VMware to allow the Virtual Machine to run properly.
4a. Run the Virtual Machine
Now that you’re all set up, you’re ready to run the Virtual Machine. In VMWare’s Desktop applications, this is done by pressing the triangular “Play” button.
You can jump to Section 5.
3b. Deploy on VirtualBox
This guide shows screenshots of the macOS version of VirtualBox (6.1). For Windows and Linux equivalent screenshots, please visit the FirstWave Wiki here.
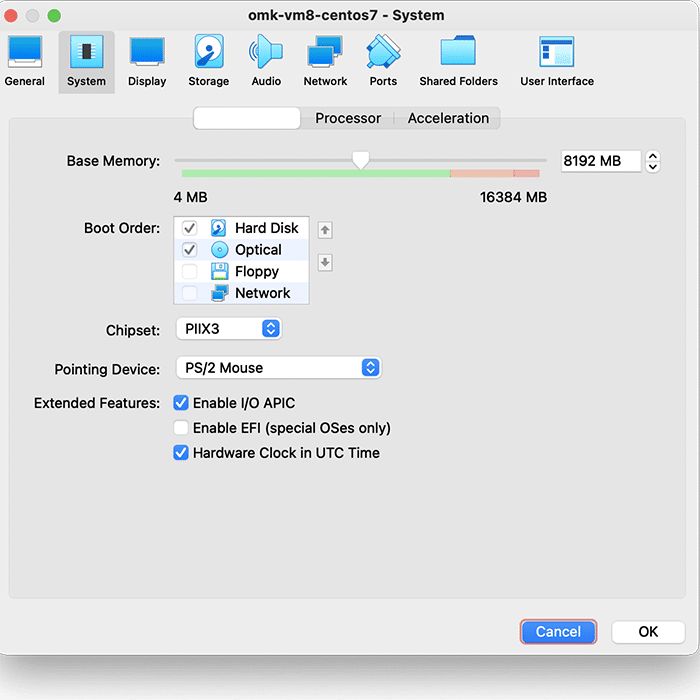
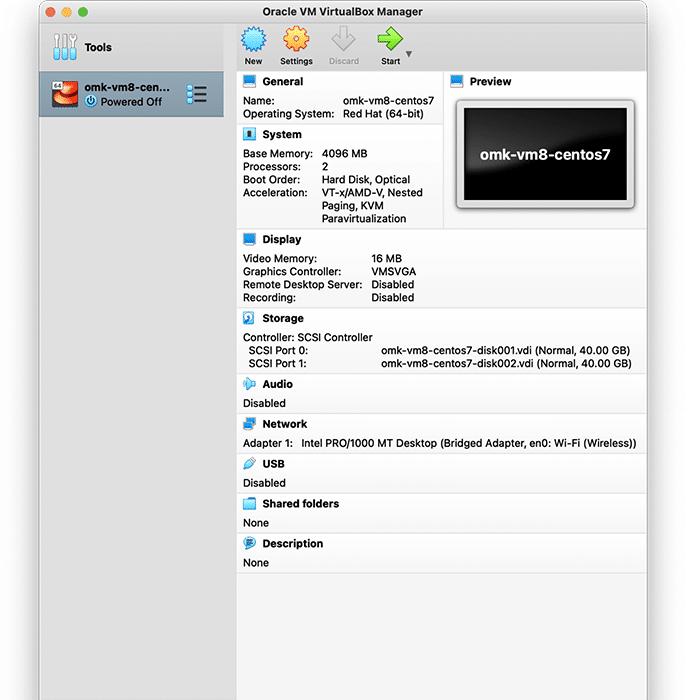
In VirtualBox, go to File>Import Appliance, and then select the FirstWave Virtual Machine .ova package you just downloaded. Select the FirstWave Virtual Machine once it’s loaded into the left sidebar of the application. Then, click on the yellow “Settings” cog. You will need to change four separate settings to allow the FirstWave Virtual Machine to run correctly. The first setting we’ll change can be found under the System tab. You need to ensure that the hardware clock is in UTC time, as below:
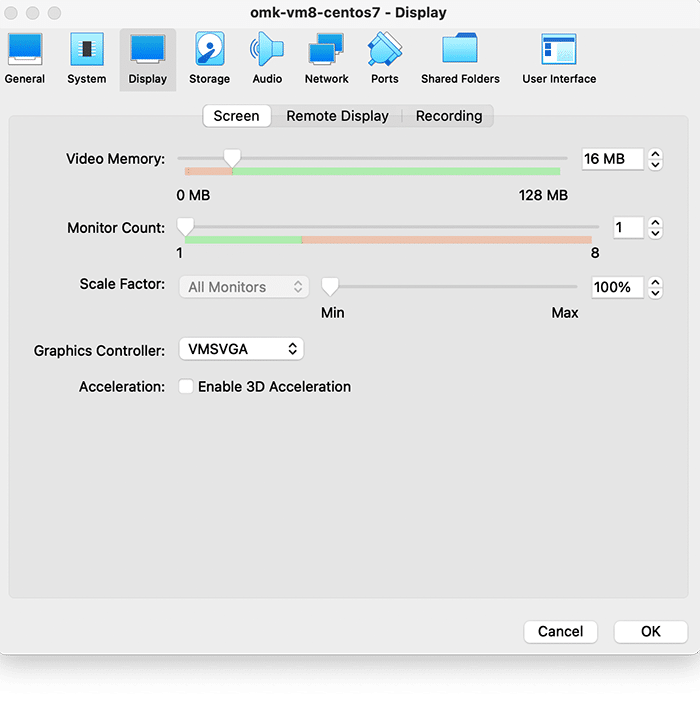
Second, select Display settings, and ensure you have allocated at least 16MB of Video Memory, and that the Graphics Controller is set to “VMSVGA”, as below:
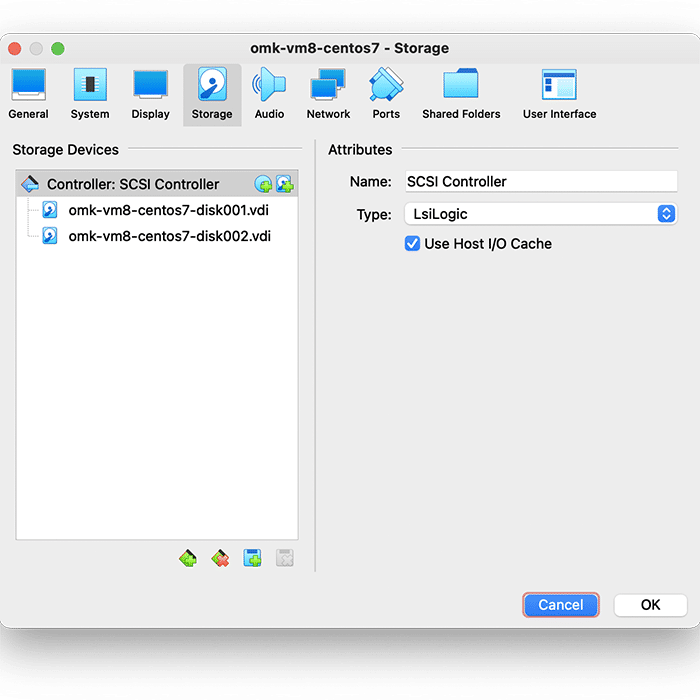
Then, select Storage settings, and ensure that “Use Host I/O Cache” is selected, as below:
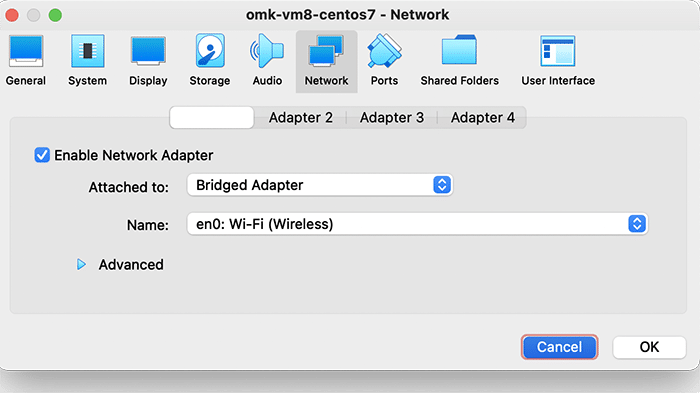
Finally, select Network settings, and ensure that Adapter 1 is attached to “Bridged Adaptor”, as below:
4b. Run the Virtual Machine
Now that you’re all set up, you’re ready to run the Virtual Machine. In VirtualBox, this can be done by clicking the green start arrow.
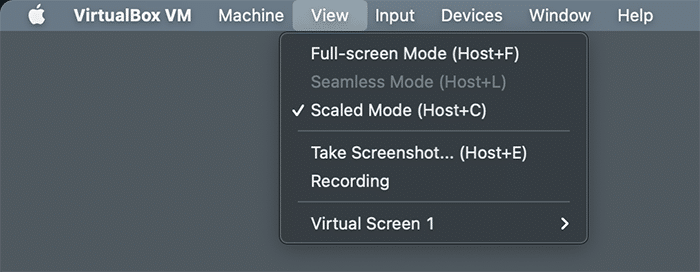
If the text is too small to read, go to Virtual Box’s View settings and select Scaled Mode, which will allow you to resize the window to your preference.
Please note that when you click within the Virtual Machine, your cursor will disappear and you will not be able to interact with your OS until you press the Host key on your keyboard. By default this key is set to Left Command ⌘ on Mac, <<<>>> on Windows, and <<<>>> on Linux.
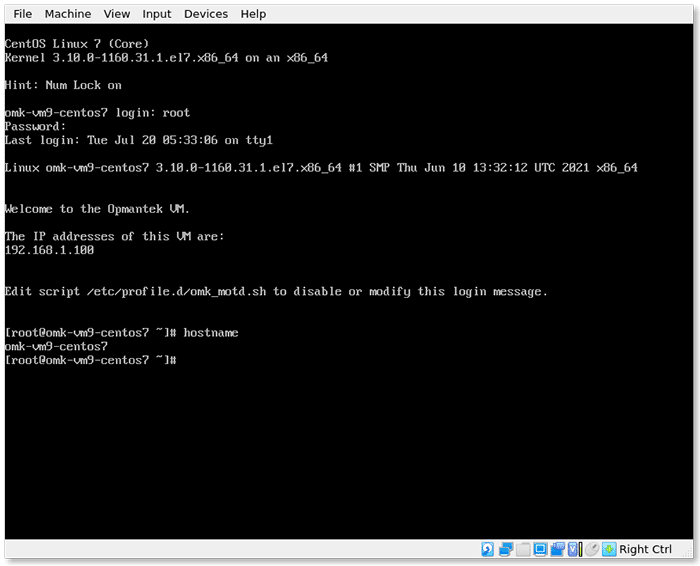
5. Log in to the FirstWave Virtual Machine
Congratulations! You should now be running the FirstWaveVirtual Machine. You’re almost there. The login screen should have loaded in the Virtual Machine.
The authentication credentials are as follows:
User: root
Password: NM1$88
Enter these details as prompted to initialize the Virtual Machine.
You will see the IP address displayed.
The default hostname for the virtual machine is omk-vm9-centos7.
License +
Good news! Each of FirstWave’s network monitoring software modules offer a free time-unlimited 20-node license. The first time you open each program, you will be given the opportunity to activate a free license.
Time-limited trials are also available if you want to test the software on a larger network, and licenses for running FirstWave’s software modules on larger networks are available by request.
Configure +
1. Download, Install and Run.
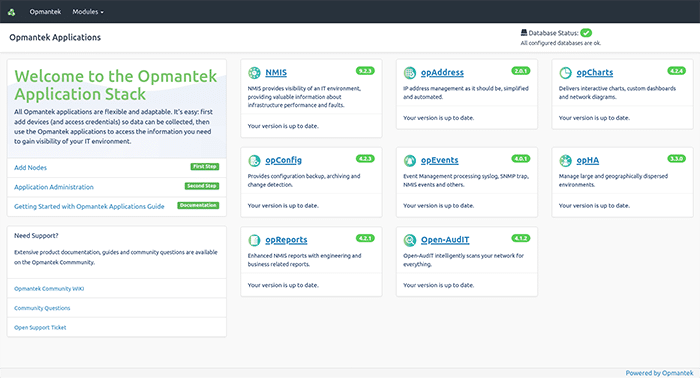
If you haven’t already, hit the download button above and download the Virtual Machine. From there go to the URL http://your-ip-address/omk (using your-ip-address from above).
 2. Add Nodes to your network
Click Add Nodes on the left side menu and you will be prompted to log in. The default credentials are: Username: nmis Password: nm1888
The localhost node will have been added by default.
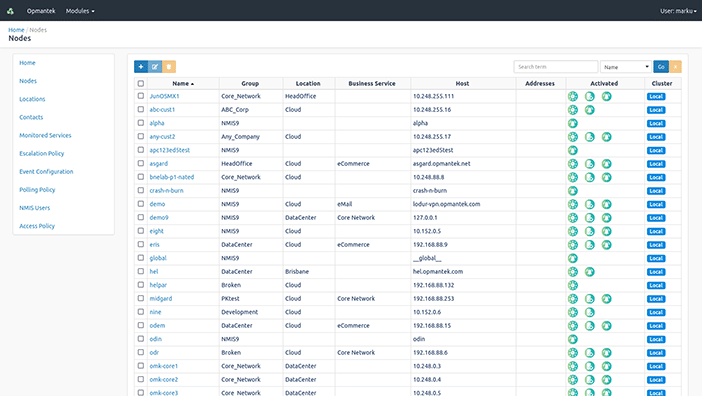
Click the blue + icon to add a node.
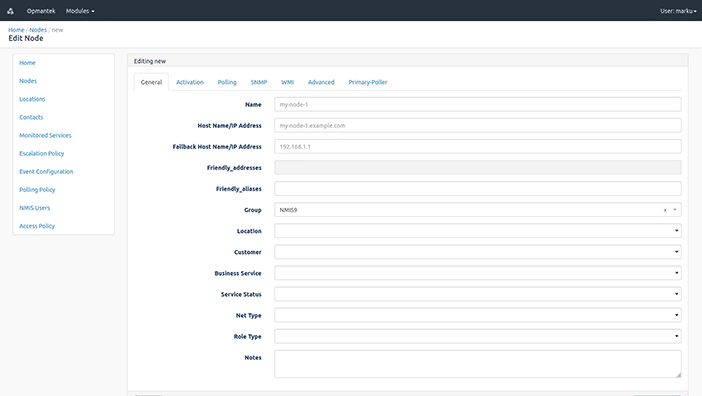
You can set a custom name for any node, and enter the IP address, SNMP type and SNMP community. There are also lists of select Locations and Groups which you can use to classify your nodes. If you don’t see an appropriate Group or Location, don’t worry—you can customize these lists later. Try adding your router first, and then repeat these steps for as many nodes as you would like.
3. Congratulations!
You are now monitoring nodes on your network!
Now you can select NMIS or opCharts and view the data you need to effectively monitor the devices on your network.
For more detailed information on configuring the applications on the VM, please see the FirstWave Wiki.
Download and Setup Guide
Need Help Getting Started?
Download NMIS
Network Management Information System (NMIS) is a tool for monitoring and managing all aspects of your network, and it works even better with FirstWave’s software modules.
The NMIS FirstWave VM bundle includes NMIS 9, Open-AudIT 4, opCharts 4, opConfig 4, opEvents 4, opReports 4, opHA 3, opAddress 2.
The best part is that you can get a time-unlimited license for up to 20 nodes for each of these modules, absolutely free!
Quick Setups
Install +
1. Download the NMIS Installer
If you haven’t already, hit the download button above and download the NMIS Installer. The Installer comes as a .run file.
2. Run the Installer in Linux Terminal
Open the Linux Terminal. Start a Terminal instance as the root user through the following command, entering your password when prompted: sudo -i
If you have not been granted access to the root user, contact your system administrator. Once your terminal session is run by the root user, run the shell command to begin the installation process
sh nmis9-<version number>.run
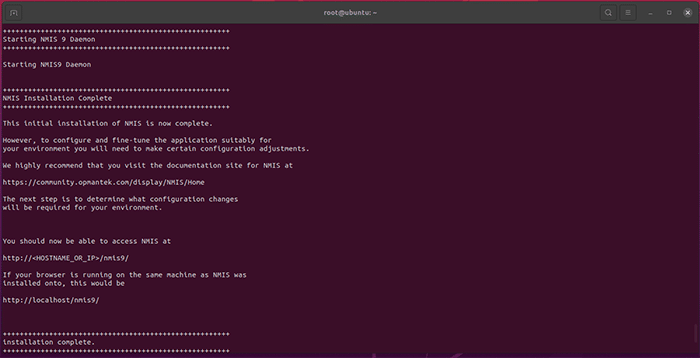
Press Y or Return/Enter when the installer prompts you. Several times throughout the installation process you will be prompted to approve the various components as they are installed on your machine. Please take note of any relevant information as you approve each step. When the installation is complete, the following will print on the Terminal:
You’re now ready to license NMIS.
License +
Good news! Each of FirstWave’s network monitoring software modules offer a free time-unlimited 20-node license. The first time you open each program, you will be given the opportunity to activate a free license.
Time-limited trials are also available if you want to test the software on a larger network, and licenses for running FirstWave’s software modules on larger networks are available by request.
Configure +
Open NMIS
Open NMIS in a browser using the address provided by the installer. If you’re accessing the software on the same machine the address will be localhost/nmis9. If you are using a different machine, use <IP_OR_hostname>/nmis9 to connect. You can find your host machine’s IP address in Network Settings.
Login to NMIS
You will be prompted to log in. The default credentials you will need to use are: Username: nmis Password: nm1888
Configure Basic Setup
We recommend that you begin by configuring the Server Name, NMIS Host, and Authentication Secret. In you need guidance, follow the walk-throughs on getting started on our Community Wiki.
NMIS Setup Complete
Congratulations! You’re now running NMIS on your machine. You can begin adding devices and nodes to your network under the Setup menu, and explore the platform’s power via the extensive documentation on the FirstWave Wiki. In no time at all, you’ll have a fuller view of your network than you’ve ever had before.
Setup Guide
Need Help Getting Started?
Download opCharts
With interactive charts and dashboards, opCharts is a complete dashboarding solution that visualizes your IT infrastructure.
The NMIS FirstWave VM bundle includes NMIS 9, Open-AudIT 4, opCharts 4, opConfig 4, opEvents 4, opReports 4, opHA 3, opAddress 2.
The best part is that you can get a time-unlimited license for up to 20 nodes for each of these modules, absolutely free!
Quick Setups
Install +
Please note that NMIS must be installed on your machine before adding opCharts or most other FirstWave network management modules. Please ensure you have installed NMIS before installing opCharts. NMIS is the underlying software required to run any of FirstWave’s individual network monitoring and management modules and can be installed on Linux. If you do not have a machine currently running Linux, you can download and install the FirstWave Virtual Machine, which includes NMIS and all FirstWave network monitoring software modules. The following installation guide should be sufficient for most users’ needs. Advanced instructions and troubleshooting are available on the opCharts Wiki.
1. Download the opCharts installer
If you haven’t already, hit the download button above and download the opCharts Installer. The Installer comes as a .run file.
2. Run the Installer in Linux Terminal
Open the Linux Terminal. Start a Terminal instance as the root user through the following command, entering your password when prompted: sudo -i
If you have not been granted access to the root user, contact your system administrator. Once your terminal session is run by the root user, run the shell command to begin the installation process
sh opCharts-<version number>.run
Press Y or Return/Enter when the installer prompts you. Several times throughout the installation process you will be prompted to approve the various components of the opCharts Module as they are installed on your machine. Please take note of any relevant information as you approve each step. When the installation is complete, the following will print on the Terminal:
You’re now ready to license opCharts.
License +
Good news! Each of FirstWave’s network monitoring software modules offer a free time-unlimited 20-node license. The first time you open each program, you will be given the opportunity to activate a free license.
Time-limited trials are also available if you want to test the software on a larger network, and licenses for running FirstWave’s software modules on larger networks are available by request.
Configure +
Open opCharts
opCharts allows you to explore the details of the network which you have configured in NMIS. You can use opCharts to improve visibility and maintain consistency across your whole IT environment through advanced tracking of device and network configuration settings.
Explore FirstWave’s extensive software documentation
You’re now ready to configure opCharts to exactly your needs and to begin monitoring events on your network using the guides on the FirstWave Wiki. In no time at all, you’ll have a fuller view of your network than you’ve ever had before.
Video Setup Guide +
Setup Guide
Need Help Getting Started?
Download opReports
Gain insight into service levels and measure the performance of your environment with advanced analysis and reporting from opReports.
The NMIS FirstWave VM bundle includes NMIS 9, Open-AudIT 4, opCharts 4, opConfig 4, opEvents 4, opReports 4, opHA 3, opAddress 2.
The best part is that you can get a time-unlimited license for up to 20 nodes for each of these modules, absolutely free!
Quick Setups
Install +
Please note that NMIS must be installed on your machine before adding opReports or most other FirstWave network management modules. Please ensure you have installed NMIS before installing opReports. NMIS is the underlying software required to run any of FirstWave’s individual network monitoring and management modules and can be installed on Linux. If you do not have a machine currently running Linux, you can download and install the FirstWave Virtual Machine, which includes NMIS and all FirstWave network monitoring software modules. The following installation guide should be sufficient for most users’ needs. Advanced instructions and troubleshooting are available on the opReports Wiki.
1. Download the opReports installer
If you haven’t already, hit the download button above and download the opReports Installer. The Installer comes as a .run file.
2. Run the Installer in Linux Terminal
Open the Linux Terminal. Start a Terminal instance as the root user through the following command, entering your password when prompted: sudo -i
If you have not been granted access to the root user, contact your system administrator. Once your terminal session is run by the root user, run the shell command to begin the installation process
sh opReports-<version number>.run
Press Y or Return/Enter when the installer prompts you. Several times throughout the installation process you will be prompted to approve the various components of the opReports Module as they are installed on your machine. Please take note of any relevant information as you approve each step. When the installation is complete, the following will print on the Terminal:
You’re now ready to license opReports.
License +
Good news! Each of FirstWave’s network monitoring software modules offer a free time-unlimited 20-node license. The first time you open each program, you will be given the opportunity to activate a free license.
Time-limited trials are also available if you want to test the software on a larger network, and licenses for running FirstWave’s software modules on larger networks are available by request.
Configure +
Open opReports
opReports allows you to explore the details of the network which you have configured in NMIS. You can use opReports to improve visibility and maintain consistency across your whole IT environment through advanced tracking of device and network configuration settings.
Explore FirstWave’s extensive software documentation
You’re now ready to configure opReports to exactly your needs and to begin monitoring events on your network using the guides on the FirstWave Wiki. In no time at all, you’ll have a fuller view of your network than you’ve ever had before.
Setup Guide
Need Help Getting Started?
Download opEvents
Centralized Log and Event Management Reduce the impact of network faults and failures using proactive event management.
The NMIS FirstWave VM bundle includes NMIS 9, Open-AudIT 4, opCharts 4, opConfig 4, opEvents 4, opReports 4, opHA 3, opAddress 2.
The best part is that you can get a time-unlimited license for up to 20 nodes for each of these modules, absolutely free!
Quick Setups
Install +
Please note that NMIS must be installed on your machine before adding opEvents or most other FirstWave network management modules. Please ensure you have installed NMIS before installing opEvents. NMIS is the underlying software required to run any of FirstWave’s individual network monitoring and management modules and can be installed on Linux. If you do not have a machine currently running Linux, you can download and install the FirstWave Virtual Machine, which includes NMIS and all FirstWave network monitoring software modules. The following installation guide should be sufficient for most users’ needs. Advanced instructions and troubleshooting are available on the opEvents Wiki.
1. Download the opEvents installer
If you haven’t already, hit the download button above and download the opEvents Installer. The Installer comes as a .run file.
2. Run the Installer in Linux Terminal
Open the Linux Terminal. Start a Terminal instance as the root user through the following command, entering your password when prompted: sudo -i
If you have not been granted access to the root user, contact your system administrator. Once your terminal session is run by the root user, run the shell command to begin the installation process
sh opEvents-<version number>.run
Press Y or Return/Enter when the installer prompts you. Several times throughout the installation process you will be prompted to approve the various components of the opEvents Module as they are installed on your machine. Please take note of any relevant information as you approve each step. When the installation is complete, the following will print on the Terminal:
You’re now ready to license opEvents.
License +
Good news! Each of FirstWave’s network monitoring software modules offer a free time-unlimited 20-node license. The first time you open each program, you will be given the opportunity to activate a free license.
Time-limited trials are also available if you want to test the software on a larger network, and licenses for running FirstWave’s software modules on larger networks are available by request.
Configure +
Open opEvents
opEvents allows you to explore the details of the network which you have configured in NMIS. You can use opEvents to improve visibility and maintain consistency across your whole IT environment through advanced tracking of device and network configuration settings.
Explore FirstWave’s extensive software documentation
You’re now ready to configure opEvents to exactly your needs and to begin monitoring events on your network using the guides on the FirstWave Wiki. In no time at all, you’ll have a fuller view of your network than you’ve ever had before.
Setup Guide
Need Help Getting Started?
Download opAddress
Eliminate IP address conflict by regaining control of IP address usage in your organization
using opAddress.
The NMIS FirstWave VM bundle includes NMIS 9, Open-AudIT 4, opCharts 4, opConfig 4, opEvents 4, opReports 4, opHA 3, opAddress 2.
The best part is that you can get a time-unlimited license for up to 20 nodes for each of these modules, absolutely free!
Quick Setups
Install +
Please note that NMIS must be installed on your machine before adding opAddress or most other FirstWave network management modules. Please ensure you have installed NMIS before installing opAddress. NMIS is the underlying software required to run any of FirstWave’s individual network monitoring and management modules and can be installed on Linux. If you do not have a machine currently running Linux, you can download and install the FirstWave Virtual Machine, which includes NMIS and all FirstWave network monitoring software modules. The following installation guide should be sufficient for most users’ needs. Advanced instructions and troubleshooting are available on the opAddress Wiki.
1. Download the opAddress installer
If you haven’t already, hit the download button above and download the opAddress Installer. The Installer comes as a .run file.
2. Run the Installer in Linux Terminal
Open the Linux Terminal. Start a Terminal instance as the root user through the following command, entering your password when prompted: sudo -i
If you have not been granted access to the root user, contact your system administrator. Once your terminal session is run by the root user, run the shell command to begin the installation process
sh opAddress-.run
Press Y or Return/Enter when the installer prompts you. Several times throughout the installation process you will be prompted to approve the various components of the opAddress Module as they are installed on your machine. Please take note of any relevant information as you approve each step. When the installation is complete, the following will print on the Terminal:

You’re now ready to license opAddress.
License +
Good news! Each of FirstWave’s network monitoring software modules offer a free time-unlimited 20-node license. The first time you open each program, you will be given the opportunity to activate a free license.
Time-limited trials are also available if you want to test the software on a larger network, and licenses for running FirstWave’s software modules on larger networks are available by request.
Configure +
Open opAddress
opAddress allows you to explore the details of the network which you have configured in NMIS. You can use opAddress to improve visibility and maintain consistency across your whole IT environment through advanced tracking of device and network configuration settings.
Explore FirstWave’s extensive software documentation
You’re now ready to configure opAddress to exactly your needs and to begin discovering devices on your network using the guides on the FirstWave Wiki. In no time at all, you’ll have a fuller view of your network than you’ve ever had before.
Setup Guide
Need Help Getting Started?
Download opHA
Ensure that your network data remains ready and available when you need it most..
The NMIS FirstWave VM bundle includes NMIS 9, Open-AudIT 4, opCharts 4, opConfig 4, opEvents 4, opReports 4, opHA 3, opAddress 2.
The best part is that you can get a time-unlimited license for up to 20 nodes for each of these modules, absolutely free!
Quick Setups
Install +
Please note that NMIS must be installed on your machine before adding opHA or most other FirstWave network management modules. Please ensure you have installed NMIS before installing opHA. NMIS is the underlying software required to run any of FirstWave’s individual network monitoring and management modules and can be installed on Linux. If you do not have a machine currently running Linux, you can download and install the FirstWave Virtual Machine, which includes NMIS and all FirstWave network monitoring software modules. The following installation guide should be sufficient for most users’ needs. Advanced instructions and troubleshooting are available on the opHA Wiki.
1. Download the opHA installer
If you haven’t already, hit the download button above and download the opHA Installer. The Installer comes as a .run file.
2. Run the Installer in Linux Terminal
Open the Linux Terminal. Start a Terminal instance as the root user through the following command, entering your password when prompted: sudo -i
If you have not been granted access to the root user, contact your system administrator. Once your terminal session is run by the root user, run the shell command to begin the installation process
sh opHA-<version number>.run
Press Y or Return/Enter when the installer prompts you. Several times throughout the installation process you will be prompted to approve the various components of the opHA Module as they are installed on your machine. Please take note of any relevant information as you approve each step. When the installation is complete, the following will print on the Terminal:
You’re now ready to license opHA.
License +
Good news! Each of FirstWave’s network monitoring software modules offer a free time-unlimited 20-node license. The first time you open each program, you will be given the opportunity to activate a free license.
Time-limited trials are also available if you want to test the software on a larger network, and licenses for running FirstWave’s software modules on larger networks are available by request.
Configure +
Open opHA
opHA allows you to explore the details of the network which you have configured in NMIS. You can use opHA to improve visibility and maintain consistency across your whole IT environment through advanced tracking of device and network configuration settings.
Explore FirstWave’s extensive software documentation
You’re now ready to configure opHA to exactly your needs and to begin monitoring events on your network using the guides on the FirstWave Wiki. In no time at all, you’ll have a fuller view of your network than you’ve ever had before.
Setup Guide
Need Help Getting Started?
Download opConfig
Interactive Dashboards and Charts opConfig is a complete dashboarding solution that visualizes your IT infrastructure.
The NMIS FirstWave VM bundle includes NMIS 9, Open-AudIT 4, opCharts 4, opConfig 4, opEvents 4, opReports 4, opHA 3, opAddress 2.
The best part is that you can get a time-unlimited license for up to 20 nodes for each of these modules, absolutely free!
Quick Setups
Install +
Please note that NMIS must be installed on your machine before adding opConfig or most other FirstWave network management modules. Please ensure you have installed NMIS before installing opConfig. NMIS is the underlying software required to run any of FirstWave’s individual network monitoring and management modules and can be installed on Linux. If you do not have a machine currently running Linux, you can download and install the FirstWave Virtual Machine, which includes NMIS and all FirstWave network monitoring software modules. The following installation guide should be sufficient for most users’ needs. Advanced instructions and troubleshooting are available on the opConfig Wiki.
1. Download the opConfig installer
If you haven’t already, hit the download button above and download the opConfig Installer. The Installer comes as a .run file.
2. Run the Installer in Linux Terminal
Open the Linux Terminal. Start a Terminal instance as the root user through the following command, entering your password when prompted: sudo -i
If you have not been granted access to the root user, contact your system administrator. Once your terminal session is run by the root user, run the shell command to begin the installation process
sh opConfig-<version number>.run
Press Y or Return/Enter when the installer prompts you. Several times throughout the installation process you will be prompted to approve the various components of the opConfig Module as they are installed on your machine. Please take note of any relevant information as you approve each step. When the installation is complete, the following will print on the Terminal:
You’re now ready to license opConfig.
License +
Good news! Each of FirstWave’s network monitoring software modules offer a free time-unlimited 20-node license. The first time you open each program, you will be given the opportunity to activate a free license.
Time-limited trials are also available if you want to test the software on a larger network, and licenses for running FirstWave’s software modules on larger networks are available by request.
Configure +
Open opConfig
opConfig allows you to explore the details of the network which you have configured in NMIS. You can use opConfig to improve visibility and maintain consistency across your whole IT environment through advanced tracking of device and network configuration settings.
Explore FirstWave’s extensive software documentation
You’re now ready to configure opConfig to exactly your needs and to begin monitoring events on your network using the guides on the FirstWave Wiki. In no time at all, you’ll have a fuller view of your network than you’ve ever had before.
Setup Guide
Need Help Getting Started?
Download Open-AudIT
Open-AudIT is a powerful network management tool used by over 130,000 organizations internationally to collect data from large and complicated networks.
Note: Windows download is not compatible with Windows 10. FirstWave use and recommend Windows Server 2016.
The NMIS FirstWave VM bundle includes NMIS 9, Open-AudIT 4, opCharts 4, opConfig 4, opEvents 4, opReports 4, opHA 3, opAddress 2.
The best part is that you can get a time-unlimited license for up to 20 nodes for each of these modules, absolutely free!
Quick Setups
Install +
Open-AudIT is one of FirstWave’s software packages available either standalone or as part of our network management suite. While this guide covers a standalone Linux installation, Open-AudIT may also be installed as part of the FirstWave Virtual Machine, which includes NMIS and all network monitoring software modules, or on Windows. You can find links to the alternative installation guides below:
<ul>
<li aria-level=”1″><a href=”https://s44538.pcdn.co/resources-hub/downloads-free-trials/#download-trial”>Installing Open-AudIT as part of the FirstWave Virtual Machine</a></li>
<li aria-level=”1″><a href=”https://community.opmantek.com/display/OA/Windows+-+Installing” target=”_blank” rel=”noopener”>Installing Open-AudIT on Windows</a></li>
</ul>
The following installation guide should be sufficient for most Linux users’ needs. Advanced instructions and troubleshooting are available on the <a href=”https://community.opmantek.com/display/OA/Home” target=”_blank” rel=”noopener”>Open-AudIT Wiki</a>.
<strong>1. Download the Open-AudIT installer</strong>
If you haven’t already, hit the download button above and download the Open-AudIT Installer. The Installer comes as a .run file.
<strong>2. Run the Installer in Linux Terminal</strong>
Open the Linux Terminal. Start a Terminal instance as the root user through the following command, entering your password when prompted: <i>sudo -i</i>
If you have not been granted access to the root user, contact your system administrator. Once your terminal session is run by the root user, run the shell command to begin the installation process
<i>sh OAE-Linux-<version number>.run</i>
Press Y or Return/Enter when the installer prompts you. Several times throughout the installation process you will be prompted to approve the various components of the Open-AudIT Module as they are installed on your machine. Please take note of any relevant information as you approve each step. When the installation is complete, the following will print on the Terminal:
<img class=”alignnone size-full wp-image-2166″ src=”https://s44538.pcdn.co/wp-content/uploads/2022/08/opConfig-Screen-1.png” sizes=”(max-width: 700px) 100vw, 700px” srcset=”http://firstwave.com/wp-content/uploads/2022/08/opConfig-Screen-1.png 700w, https://s44538.pcdn.co/wp-content/uploads/2022/08/opConfig-Screen-1-300×153.png 300w” alt=”” width=”700″ height=”358″ />
You’re now ready to license Open-AudIT.
License +
Good news! Each of FirstWave’s network monitoring software modules offer a free time-unlimited 20-node license. The first time you open each program, you will be given the opportunity to activate a free license.
Time-limited trials are also available if you want to test the software on a larger network, and licenses for running FirstWave’s software modules on larger networks are available by request.
Configure +
<strong>Launch Open-AudIT </strong>
Launch Open-AudIT in a browser using the address provided by the installer. If you’re accessing the software on the same machine the address will be localhost/omk/open-audit. If you are using a different machine, use <IP_OR_hostname>/omk/open-audit to connect. You can find your host machine’s IP address in Network Settings.
<strong>Open-AudIT</strong>
Open-AudIT allows you to discover devices and to take inventory of who and what is connected to your network. When you open the software, you should be greeted by the landing page below.
<strong>Explore FirstWave’s extensive software documentation</strong>
You’re now ready to configure Open-AudIT to exactly your needs and to begin discovering devices on your network using the guides on the <a href=”https://community.opmantek.com/display/OA/Home” target=”_blank” rel=”noopener”>FirstWave Wiki</a>. In no time at all, you’ll have a fuller view of your network than you’ve ever had before.
Video Setup Guide +

Need Help?
Find out how FirstWave can scale your network
management and cybersecurity of your business?